Avoid Windows 10 Wifi Sense without adding '_optout' to your SSID
I recently found out that Windows 10 will come with Wi-fi Sense, which lets you share your wireless network password with groups of Outlook, Skype and/or Facebook contacts. While the idea isn't bad, I think the implementation is lacking. It appears that you can "opt out" rather than needing to "opt in".
To ensure that my wireless network password does not get shared via Wi fi Sense I've made a couple changes to my network:
- Configured a FreeRADIUS server on my pfSense home firewall
- Set my Wireless network to WPA2-Enterprise
While I could have just appended "_optout" to the end of my WiFi SSID, I think its poor form for a huge multinational corporation to require me to out of my way to opt-out of their latest gimmick of the week I mean really guys, what's up with that?
In this article I'll describe how I got FreeRADIUS and my wireless router working together.
References
- WiFi Sharing
- Wi-Fi Sense FAQ [windowsphone.com]
- How do I opt my network out of Wi-Fi Sense? [windowsphone.com]
- Wi-Fi Sense and 802.1x [windowsphone.com]
- Windows 10 Wi-Fi Sense shares Wi-Fi networks with your friends [nakedsecurity.sophos.com]
- Windows WiFi Sense is a useful feature misunderstood by the media [betanews.com]
- RADIUS and 802.1x
- RADIUS [wikipedia.org]
- IEEE 802.1x [wikipedia.org]
- Protected Extensible Authentication Protocol (PEAP) [wikipedia.org]
- Securing Wi-Fi with PEAP and FreeRADIUS on CentOS [kirkkosinski.com]
- PEAP Authentication - Configuration example for Windows 7 [supportforums.cisco.com]
Install FreeRADIUS on pfSense
Note: This guide is current for pfSense verion 2.2.3
- Login to your pfSense portal
- Navigate to System -> Packages
- Select the Available Packages tab
- Install the freeradius2 package
Configure FreeRADIUS
Once the freeradius package is installed we need to configure a few things:
- Interfaces
- Access points
- Configure EAP
- Users
Set a Radius Interface
- Navigate to Services -> FreeRADIUS
- Click on the Interfaces tab
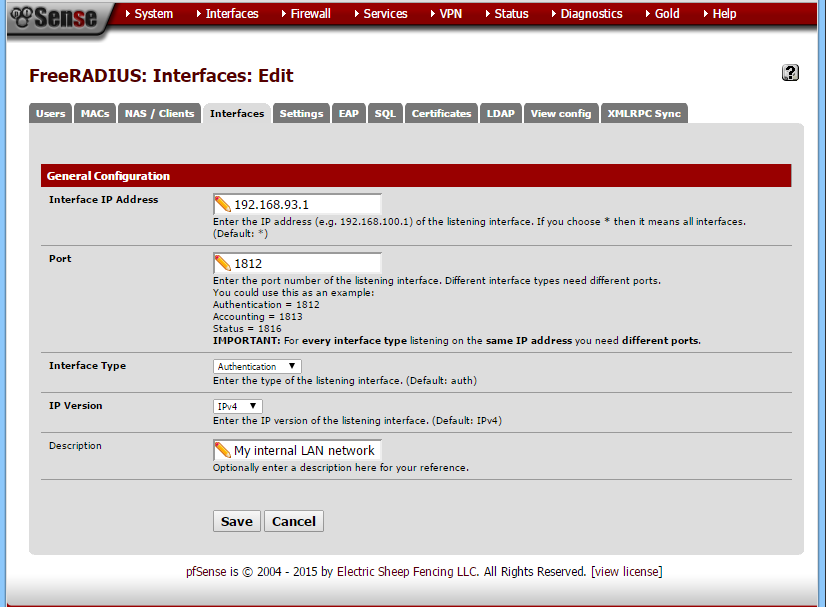
- Click the Add icon (looks like a small plus sign). Ok, now you'll have to fill out some settings
- Interface IP Address: Enter the LAN IP Address of your pfSense LAN network. Typically this is something like 192.168.0.1 or 10.0.0.1. I would not suggest binding to all interfaces as that may include the open internet.
- Port: I suggest leaving this set to 1812, which is the default
- Interface Type: Leave it set at 'Authentication'
- IP Version: If your like most people you'll leave this set at IPv4
- Description: This lets you enter descriptive text so you can remember what this is if you come back later. Since I only have one interface that I run FreeRADIUS on, I just leave this blank
Click the Save button
Configure an Access Point / Client / 'NAS'
The next thing to do is to configure the Wireless Access Point that will be connecting to the RADIUS server.
- On the FreeRADIUS screen, Click on the NAS / Clients tab
- Click the plus sign button to add a new client
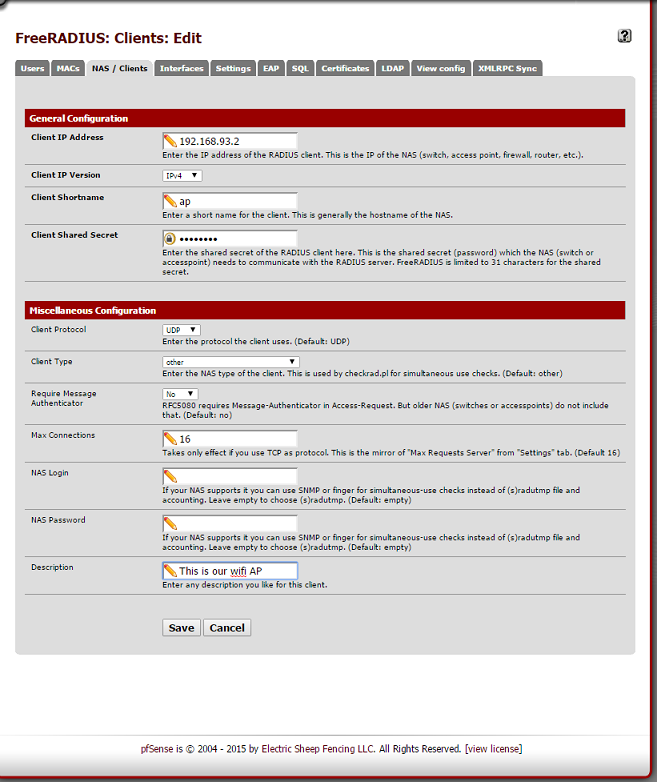
- Now you'll need to enter some configuration settings:
- Client IP Address: This is the IP Address of your wireless router / access point
- Client IP Version: Most people will leave this set to IPv4
- Client Shortname: Enter a short name here that identified your wifi access point. I just used 'ap'
- Client Shared Secret: Remember what you type here, we'll need it later when configuring the Wireless Access Point! RADIUS uses this to know that the AP is authorized
- Client Prototol: I left it at the default of UDP
- Client Type: I left this at 'other'. If you have a device listed you might try it, though...
- Require Message Authenticator: I left this at 'No' since I can't rely on home WiFi Access Points being conforment to all RFCs that I care about or use.
- Max Connections: Leave at the default unless you need to change it.
- NAS Login: I left this blank
- NAS Password: I left this blank
- Description: Enter a brief blurb about your wireless access point
Click the Save button
Example screenshot:
Configure EAP for PEAP
In order to make effective use of FreeRADIUS we need to make sure we configure our EAP properly. This lets us determine how clients (like our wifi access points) can know how to authenticate users.
- From the FreeRADIUS page in pfSense, click the EAP tab
- Configure the settings: (I'll only go over the ones I used to get this working)
- EAP Section
- Disable weak EAP types: Check this box!
- Default EAP Type: Set this to PEAP
- Expiration of EAP-Response / EAP-Request List: Leave at default of 60
- Ignore Unknown EAP Types: Leave this at default of No
- Cisco Accounting Username Bug: Leave this at default of No (unless you need it??)
- Maximum Sessions Tracking per Server: Default of 4096 works for my network!
- Certificate for TLS
(This assumes that you've uploaded certificates to the pfSense Certificate manager or that you are going to stick with the default self-signed cert generated by FreeRADIUS)
- Choose Cert Manager: Check this box if you have a certificate you have uploaded to the pfSense Certificate Manager and want to use it. Otherwise leave it unchecked
- Private Key Password: Leave this at default (worked for me for both self-signed and uploaded certificates)
- SSL CA Certificate: If you uploaded a CA cert and a Server cert to pfSense Cert manager, pick the correct CA here
- SSL Revocation List: If you have or want to use this, select the appropriate options
- SSL Server Certificate: Pick the server certificate that you uploaded
(For this to work you must check the 'Choose Cert Manager' checkbox above!)
<Skip some sections that I don't care about>
- EAP-PEAP
- Default EAP Type: Set this to MSCHAPv2 as its the most compatible
- Copy Request to Tunnel: I left this at the default of 'No'
- Use Tunneled Reply: I also left this at the default of 'No'
- Microsoft Statement of Health (SoH) Support: While this sounds cool, I have not dug into how to configure it so I left it at 'Disable'
- Click the Save button to save your settings
Add RADIUS User(s)
Now that the basic configurations are in place we can add users
- From the FreeRADIUS page in pfSense click on the Users tab
- Click the plus button to add a user
- In this example I suggest entering:
- Username
- Password
- Leave the Password encryption set to 'Cleartext-Password'
Click the Save button
You'll undoubtedly note that there are MANY more settings here. Since I'm just using username/password auth, I'm not touching anything else at the moment
A Note on Windows 7 clients
The easiest way for me get Windows 7 laptops added to my wireless network was to get an SSL cert issued through COMODO and configure FreeRADIUS to use it. Without this I would have had to spend a lot more time just to get friends laptops to connect.
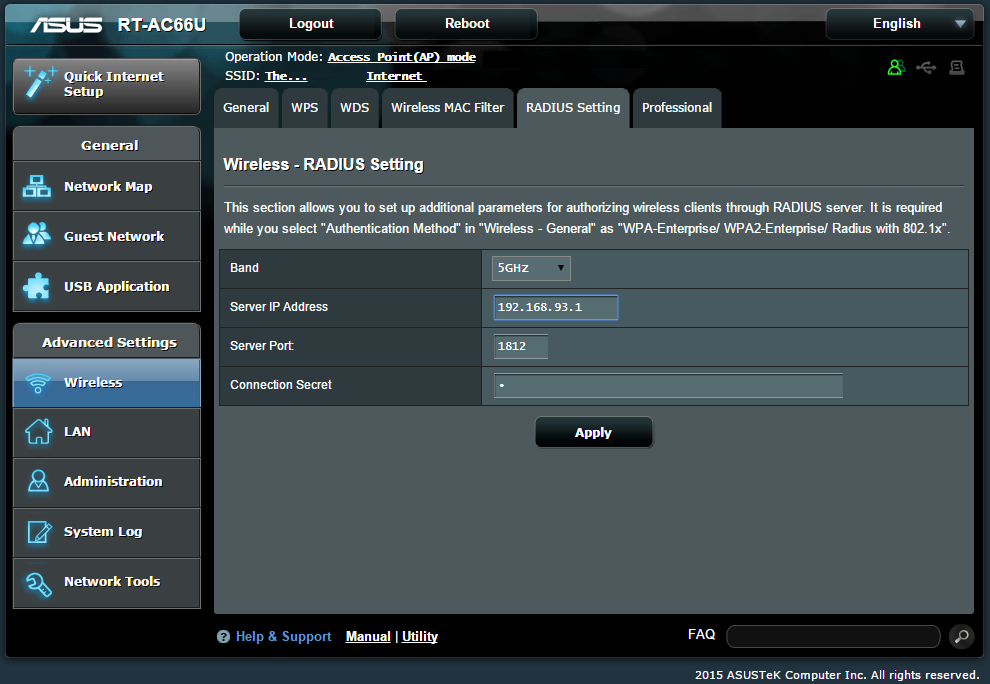
Configure the Wireless Access Point
At this point we stray into the realm of RTFM. I don't know what kind of router that you have, so you'll need to read the manual to see if it supports 802.1x authentication. Here's a screenshot from my home AP which shows what the configuration screen should look like: