
GIT Part 1: Install the 'Server' and create a repository
My first exposure to GIT was around 14 months ago. I was trying to get a GIT 'Server' setup and working with several Windows workstations. After awhile I gave up and moved on to more interesting projects. SVN was working fine for me anyway, thank you very much.
GIT didn't show up on my radar again until last week. Over the next few weeks or so my employer will be migrating everyone from Subversion to GIT. As I don't have any concept of how to use GIT, it seems logical to spend some time getting acquainted with it before I have to start using it full time.
This article focuses on how to setup a GIT 'Server' and repository that can be accessed by anyone with SSH access to the server.
Update: GIT Article 2 covers how to get TortoiseGIT up and running
Notes:
- GIT
- GIT Homepage [git-scm.com]
- Git on the Server [git-scm.com]
- Configure GIT [git-scm.com]
- GIT 'Bare' Repository [sitaramc.github.com]
- Other helpful info
- SVN versus GIT [blog.codesion.com]
- GIT Clone versus Pull [stackoverflow.com]
Background
As a subversion user I found I had to change my mindset when working with GIT. In SVN I was able to easily "Check out" source files from the repository, alter them on my local dev environment then "Commit" the changes back to the repository. With GIT I have found the process to work a little differently (If you know a better way, let me know in the comments below):
- I Clone a GIT repository from somewhere (could be on a server or on someone's workstation)
- This creates a master branch on my workstation with all the source code for the project.
- Make changes to the source files as necessary
- Commit the changes to my local repository
- This does not alter the repository where you cloned from in step 1
- Push the changed source files back to the origin (cloned from in step 1)
SVN is a client / server architecture where GIT is distributed. When I went to setup my central GIT 'Server' this became apparent very quickly.
Installation
Here is what I had to do to get GIT setup in a Linux environment:
- Install Centos 6.2
- Install GIT using the yum package manager
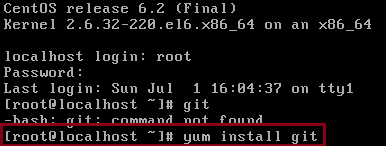
$ yum install git worked for me.
Configuration
Once GIT is installed there is a some configuration that should be done. For more information see the configuration information provided by the GIT team. For this example we'll just setup the contact user:
- $ git config --global user.name "Rion the Repository cReator"
- $ git config --global user.email rion@sub.domain.tld

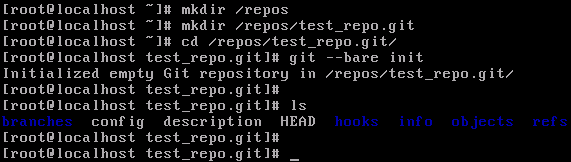
Create a "Bare" repository
At this point we can create a new repository that can be used for our source code. In this example we will be creating a 'bare' repository that can be accessed by other users. A Bare repository is the best choice in this case since multiple GIT clients from different systems will be pushing / pulling source code from this repo (I'm still thinking in terms of SVN- just trying to get the server side piece working):
- Create a folder which will hold your repositories (Example creates a 'repos' dir off of root:
- $ mkdir /repos
- Create a sub-directory for the GIT repository (this should end in .git by convention):
- $ mkdir /repos/test_repo.git
- cd into the .git directory
- $ cd /repos/test_repo.git
- Execute the git command to initialize a bare repository:
- $ git --bare init
Here is what those commands look like on my demo server. I ran an ls afterwards so you can see what the folder contents look like:
Make it a "Server"
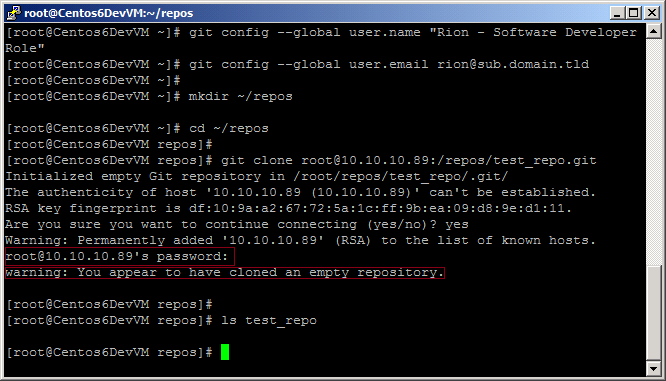
At this point you have a fully functional GIT server for anyone who has SSH access to the server and read/write rights to the repository we just created. I'll cover how to work with repositories in more detail in future articles.
For now I want to note the raw CLI steps you can perform from a remote machine to copy the repository local for editing:
- First, setup your GIT user contact information (if you haven't already done so):
- $ git config --global user.name "Rion - Software Developer Role"
- $ git config --global user.email rion@sub.domain.tld
- Next, create a directory where you want to store your GIT repositories (remember that GIT is distributed and you always have all the source code for the repo available on your local machine):
- $ mkdir ~/repos
- $ cd ~/repos
- Perform a GIT clone operation to grab the bare repository that we just setup:
- $ git clone username@ip.address.here:/repos/test_repo.git
- You may need to accept the ssh key of the repository server
- You will have to enter in the Password for the user if you don't have key authentication setup
Here is what the above process looks like on one of my Linux Client VMs:
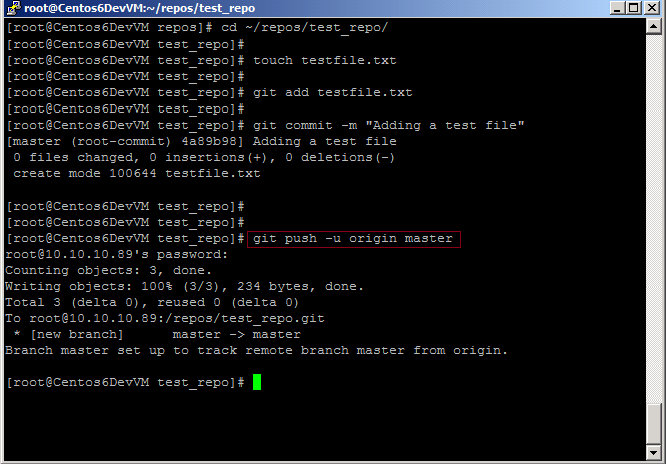
Here is how you would add and commit a file to your local repository then push the changes up to the origin (repo on the server):
- $ cd ~/repos/test_repo
- $ touch testfile.txt
- Created a new file in the local repository
- $ git add testfile.txt
- Tells git that the file is versioned
- $ git commit -m "Adding a test file"
- Commits the file + comment to the local repository
- $ git push -u origin master
- This magically pushes your changes up to the origin (repo where you originally cloned from)
Here is what the process looks like from one of my Linux client VMs:
I will be adding more articles about GIT as I become more familiar with it. Stay tuned...
Update: GIT Article 2 covers how to get TortoiseGIT up and running